


Beginning Basics: Getting Started with Elleta
Whether you're brand new to WordPress or would just like a quick lesson on basic Elletta theme features, you're in the right place! Below, we'll go through a number of how-tos regarding standard theme functions, from installing the theme to setting up your sidebar, recipe card, and more.
To skip directly to a specific section in the article, please use this index:
- Installing the theme
- Creating a post
- Creating a page
- Creating a category page
- Homepage settings
- Homepage Slider settings
- Featured Area Home
- Creating a main menu
- Adding a featured image
- Adding social icons
- Setting up your widgets
- Setting up your newsletter widget
- Setting up your sidebar
- Setting up the header area
- Setting up the footer area
INSTALLING THE THEME
When you purchase a Elletta license from Creative Market download the theme package, you will receive a zipped folder.
Unzip this first folder.
Within the unzipped theme package, you will find a number of folders such as demo content, documentation, logo image files, etc. There is also 1 additional zipped folder within, titled "elletta.zip".
Important: DO NOT unzip this "elletta.zip" folder! This particular .zip folder should remain zipped.
"elletta.zip" is the main theme.
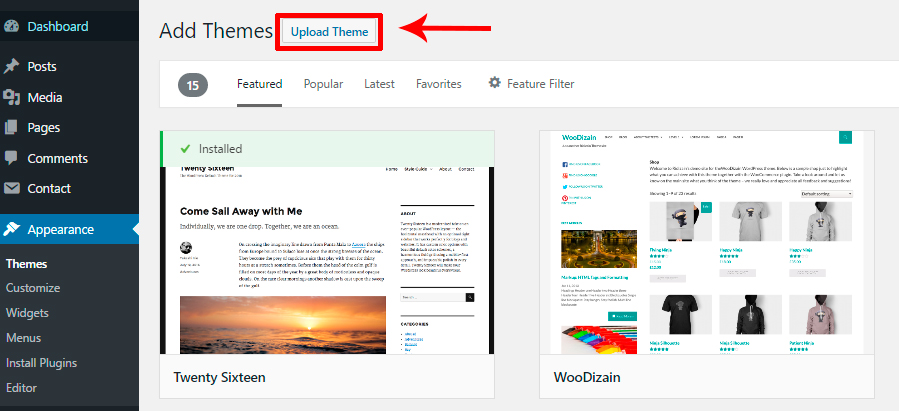
Within your WordPress Dashboard, navigate to Appearance > Themes.
Click the "Add New" button at the top-left of the page > Click the "Upload Theme" button at the top.
Click "Choose File" > find your zipped "elletta.zip" file > Click the "Install Now" button.
Once the theme is successfully installed on your WordPress, you can "Activate" it via the installation page or via Appearance > Themes to switch over and begin using your Elletta theme!
Please note: If you try installing the entire zipped theme package or another incorrect file, you'll likely receive this error message:
"The package could not be installed. The theme is missing the style.css stylesheet. Theme install failed."
If you receive this error message, please be sure that you're installing the ZIPPED file titled "elletta.zip".
CREATING A POST
Elletta has the possibility to create 7 different types of posts: standard, audio, sound could, video, gallery, quote, and link.
In order to activate these post options, you'll first want to ensure you've installed & activated the required Meta Box plugin. This plugin comes included with the theme.
When you first activate Elletta, you should notice a banner notification across the top of your dashboard advising you to install specific required & recommended plugins.
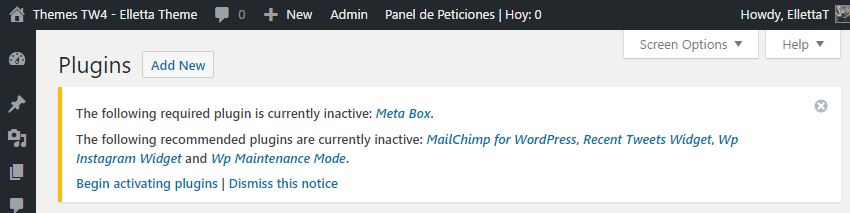

Install & activate the Meta Box plugin by clicking the "Begin installing plugins" link. Check the boxes next to the plugins > select "Install" from the drop-down menu > and click "Apply".
After, follow the same steps yet select "Activate" from the drop-down menu (plugins need to be both installed AND activated to function).
To create a new post, go to WordPress Dashboard > Posts > Add New.
Above your content box & toolbar, you'll see a series of tabs titled Standard, Gallery, Video, and Audio. Select whichever tab you'd like your post format to be in. Each tab will give you different input boxes depending on the content you'd like to add.
Standard Post
A standard post is the default post type.
You can add text and images to your post using the tools and content box.
Example of a standard post: http://elletta.tuweb4.com/bay-come-on-home/
Gallery Post
A gallery post allows you to create a slideshow-type gallery at the top of your post. After clicking the "Gallery" tab to choose this post format option, click the "Pick Images" button within the "Gallery Images" box that has appeared. Select whatever images you'd like from your WordPress Media Library.
Example of a gallery post: http://elletta.tuweb4.com/coffee-table-jazz/
Video Post
A video post displays a video at the top of your post. You can share videos from nearly all video hosting sites, such as Vimeo or Youtube. Simply copy & paste the video's URL, oembed code, or embed code into the special input box. When you preview or publish your post, the video will appear.
Example of a video post: http://elletta.tuweb4.com/heal-tomorrow/
Music Post, audio post, Could post
An audio post allows you to share a music or audio track and displays it at the top of the post. Like the video post, simply copy & paste the track's URL, oembed code, or embed code into the special audio input box. When you preview or publish the post, the track will appear.
Example of an audio post: http://elletta.tuweb4.com/panda-desiigner/ - http://elletta.tuweb4.com/fade-to-black/
Once you've determined your desired post format, entered your title, and added your content, remember to assign at least 1 category to your post. Additionally, also ensure you assign a featured image to the post.

Once you're finished preparing your post, you can click "Preview" to preview how your post will look once published onto your site, click "Publish" to have it appear on your site, or click "Save Draft" to save your post as it is, though not publish it yet.
CREATING A PAGE
A standard, static page is similar to creating a post in many ways, and is ideal for creating an About Me or Contact section to your website.
You can create any number of pages with content. Elletta includes several options to choose from, and you will need to choose the page template that suits your needs. All of this is done in the pages section of your WordPress Admin.
Follow These Steps Below To Create A New Page
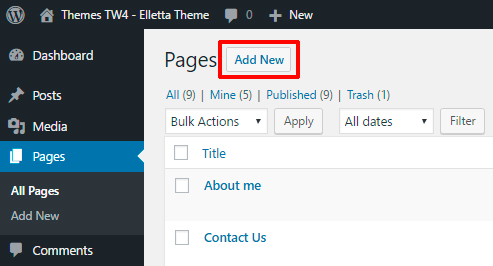
- Navigate to Pages and clickAdd New
- Input a new name for your page, then find the Page Attributes box on right side
- Set your Parent page; it’s usually set to No Parent
- Set your template from the dropdown list. See list of page templates below
- Select page options in the Page Configuration box. See the Page Options section of this document
- Content for your page goes in the editing field, use the Visual or Text editor.
To change the settings pages go to Apperance – > Customize -> Pages Settings.

Once you've published your new page, it will not automatically appear in your main menu. For a tutorial on adding items to your main menu, please check out this FAQ article: How do I set up my navigation menu?
CREATING A CATEGORY PAGE
A category page is a dynamic page that pulls in all of your posts assigned with a particular category.
You do not create a category page like you would a standard page (described above).
A category page is generated by WordPress after you add a category to your main menu.
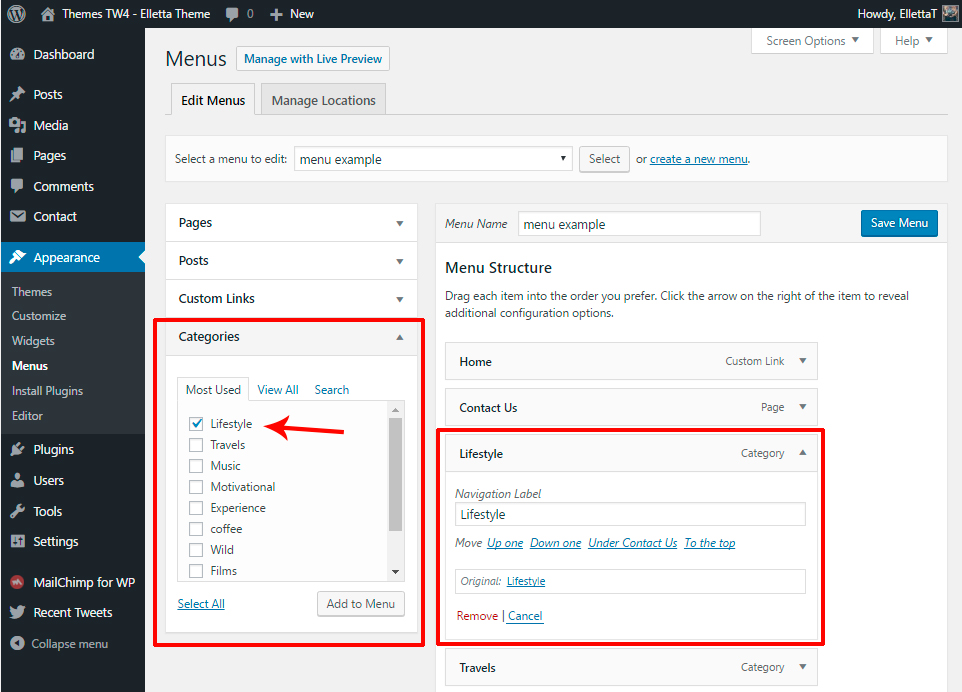
First, ensure you've assigned the category to at least 1 published post.
Then, navigate to WP Dashboard > Appearance > Menus and click the drop-down box heading titled "Categories" on the left of the page. Below, your categories will be listed. Check the box next to your desired category and click "Add to Menu". Be sure to save.
When you click on the newly-created menu item, it will take you to that category's page.
For more information on creating a category page, please check out: How do I set up my navigation menu?
ADJUSTING THE LAYOUT OF YOUR CATEGORY PAGES:
Category Pages which display all posts related to a particular category, Tag Pages which display all posts related to a particular tag, Author Pages which display all posts related to a particular author, etc., are called "Archive Pages".
To change the page layout of your archive pages, head to Appearance > Customize > Page Settings > and choose from the layout options within the "Layout Page" section.
Here, you can also enable or disable the sidebar from displaying on Archive pages.

HOMEPAGE SETTINGS
Your homepage is the first page visitors will see when they arrive at your website. By default, the homepage will be the page that also displays all of your posts, beginning with the most recent. We call this feature the "post feed".
To customize how your homepage looks, including its layout, colors, enabling/disabling the sidebar, etc., navigate to WordPress Dashboard > Appearance > Customize
Under the various drop-down tabs on the left of this screen, you'll find loads of ways to customize your homepage & website in general.
For example, within the "Home Settings" tab, you can choose your homepage's post layout, enable/disable the sidebar and Home Layout

Be sure to explore the various options within this Customizer section. The live preview on the right will show you a preview of how each adjustment will visually affect your site.
If you'd like your homepage to instead be a static page and have your post feed display on another page entirely, please check out our tutorial here: How to create a static homepage & separate blog page.
Home Slider Settins
It is very easy to create the Sliders on the Home page, let’s look at three steps how to configure and create the Slider.
Step 1
Firstly, you ave to go to Apperance > Customize > Home sliders Setting where you can ckeck the appearance that it has in the next image:
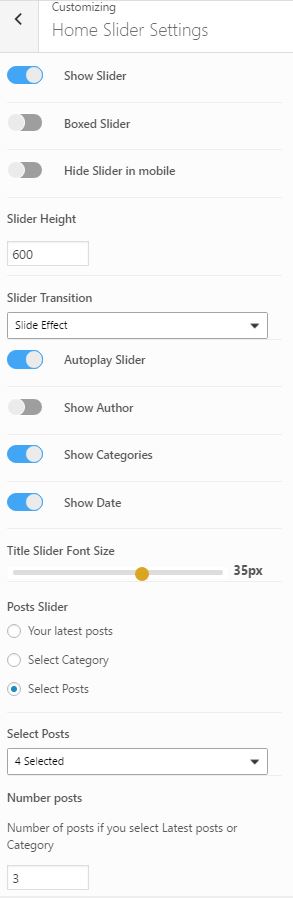
Step 2
Following the image order, we chose whether we want to show or nor the slider at home page, if you want it in Box format and if finally you want to show ii for mobile devices
- Show Slider
- Boxed Slider
- Hide Slider in mobile
After it you have Slider Transition, which I list below
- Slider effect
- Fade Effect
- Cube Effect
- Coverflow Effect
The rest of availabe options, as autoplay, shown autor, categories, date and size of the title source
- Autoplay Slider
- Show Author
- Show Categories
- Show Date
- Title Slider Font Size
As far we have indicated how visitors will see the slider in the web, now we need to indicate the information to show, which will be the third step
Step 3
Finally we indicate the infomation that the slider will show, we will see the Post Sliders
- Your latest posts: last published post
- Select Category: select a categoty, the post of this category will be shown in the sider
- Select Posts: you can choose the post you want of all written
- Number posts: number of posts if you select Latest posts or Category
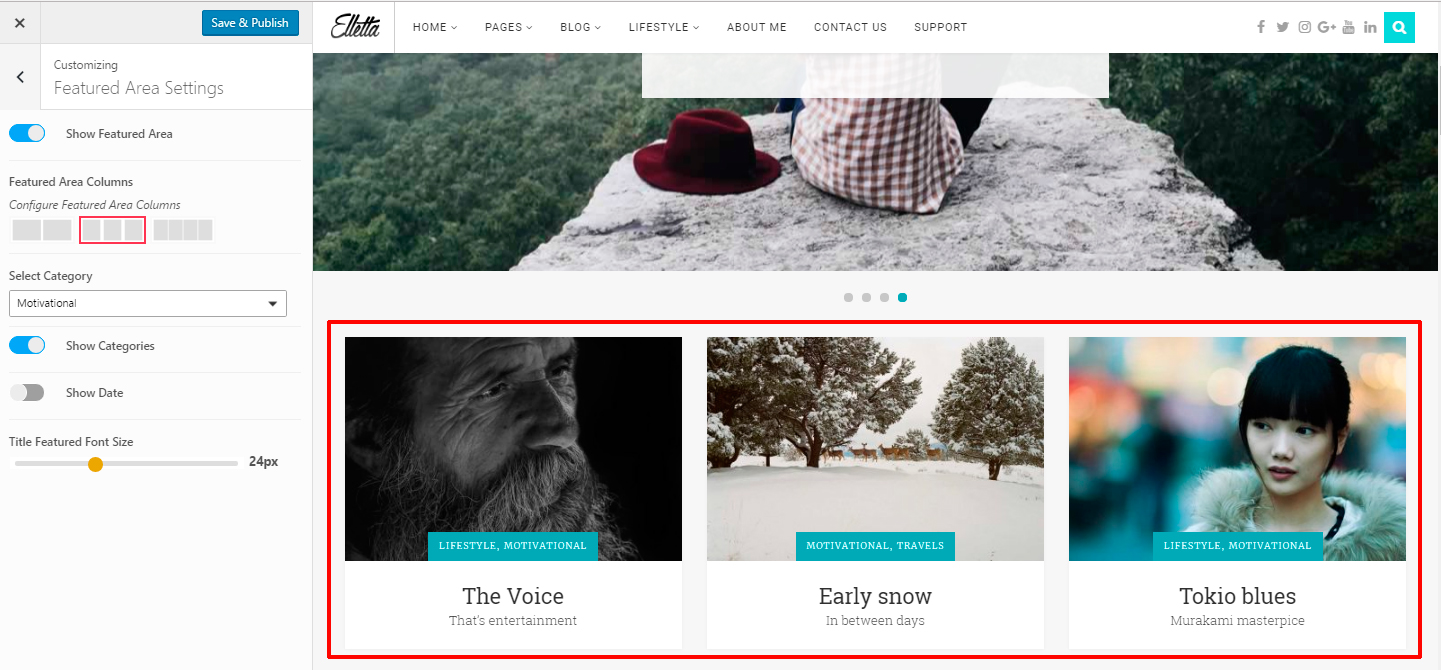
FEATURED AREA SETTINGS
You can see the different options Apparence > Customize > Featured Area Settings
You just have to try the different options. Everything is very visual
CREATING A MAIN MENU
Setting up Elletta's main menu is quite simple! For a walk-through on how to go about it as well as more specific how-to tutorials, please check out: How do I set up my navigation menu?
ADDING A FEATURED IMAGE
Assigning a featured image to your posts is very important, as the featured image is what the theme & other web functions use to visually represent the post in various situations.
For a walk-through on where and how to assign a featured image, please take a look at: How do I add a Featured Image?
ADDING SOCIAL ICONS
SOCIAL ICONS IN TOP BAR & FOOTER:
Navigate to Appearance > Customize > Social Media Settings.
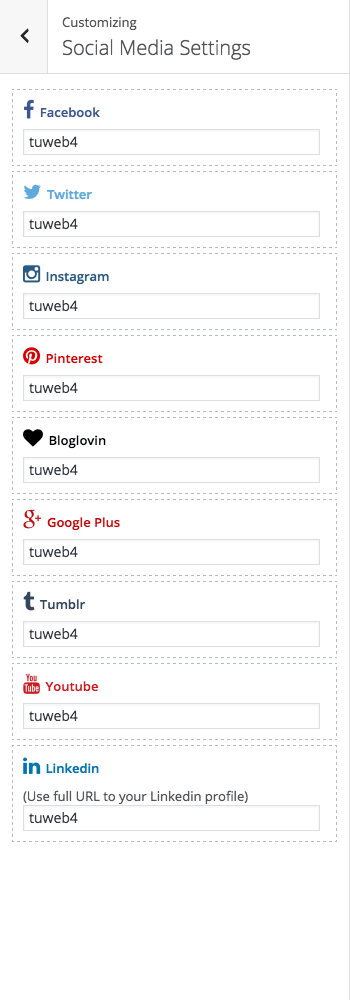
Here, you will see a list of social networks followed by a text input box. If you'd like to have a social icon for a particular social network, you can type in your username for that particular network.
Please note that you do not need to insert your profile's full URL into this box unless prompted to do so. Only your related username is required. The username you enter will be added into a pre-set URL for the network.
Once you enter your username into a particular social network's text box, its icon will appear in your top-bar & footer social icon areas. If you leave a social network's box blank, the social icon will not appear in the top-bar or footer areas.
SOCIAL ICON WIDGET:
To add the social icon widget to your sidebar, navigate to WP Dashboard > Appearance > Widgets.
Drag the widget titled "elletta - Social Media Icons" into your Sidebar's widget area. Check the box for the social networks you'd like to display in the widget.
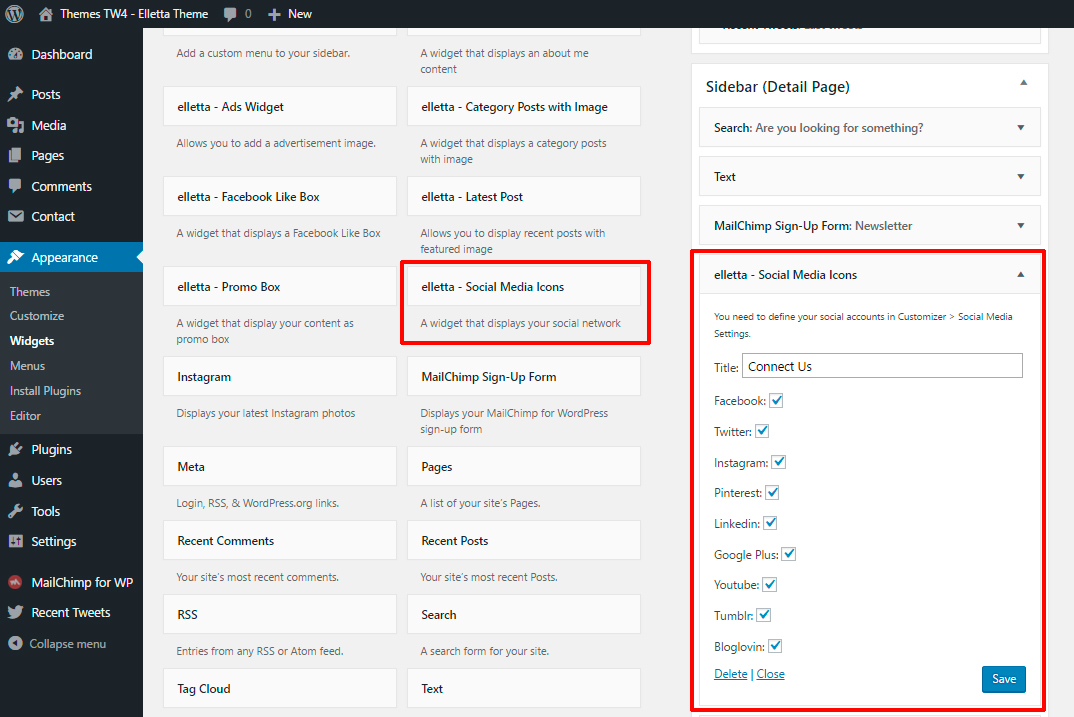
Please be sure you've also entered your related social networks' usernames within Appearance > Customize > Social Media Settings, otherwise the social widget's icons won't know where to link.
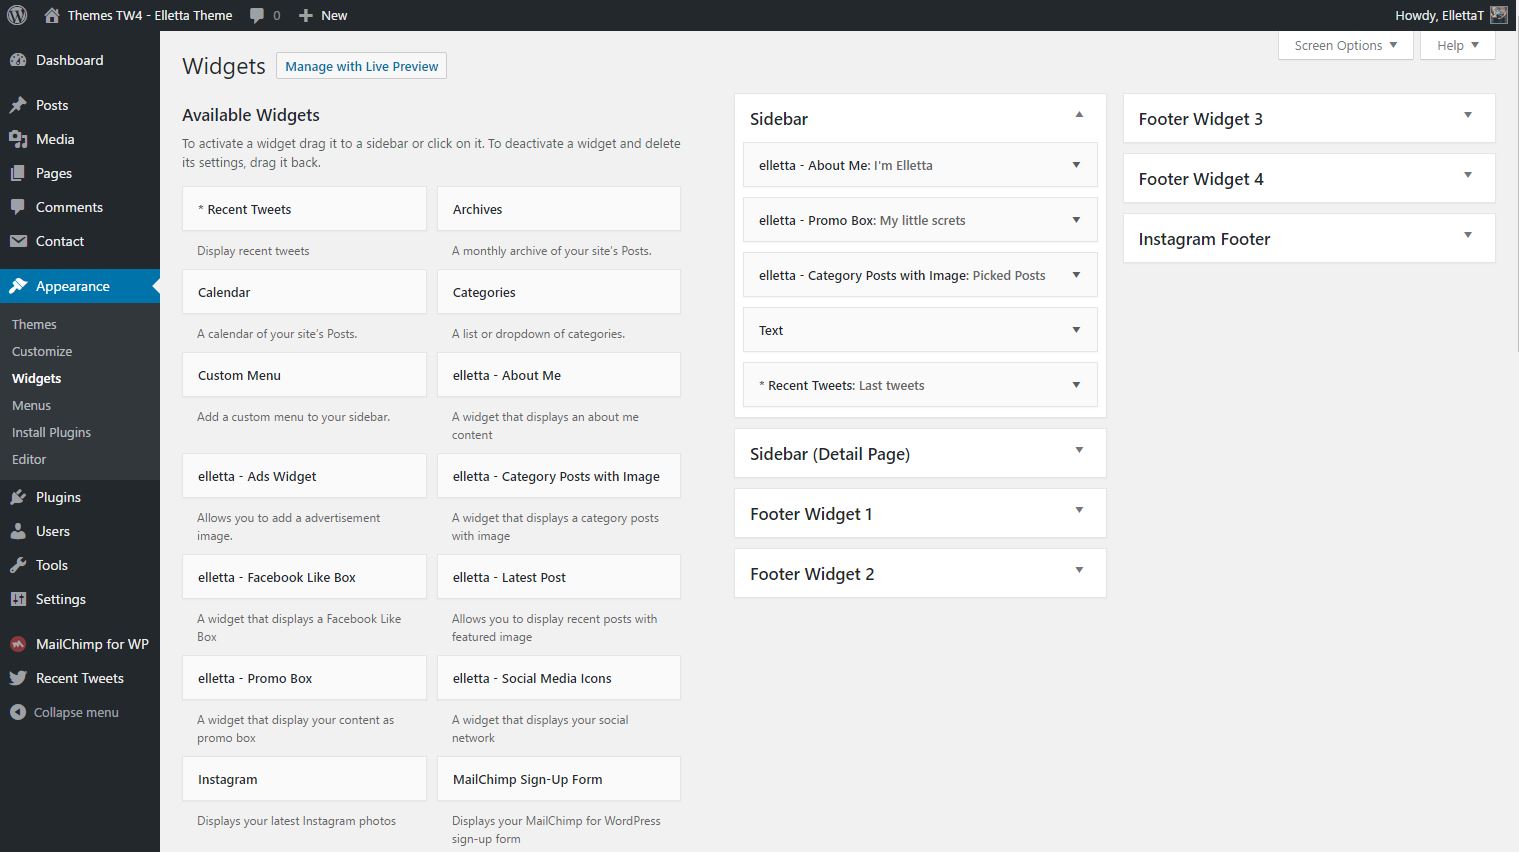
SETTING UP YOUR WIDGETS
Elletta includes many widget areas. You can use them for diffrent pages. The below image presents all widgets that are used for the sidebars
- Elletta – Ads Widget
- Elletta – Facebook Like Box
- Elletta – Promo Box
- Elletta – About Me
- Elletta – Category post with image
- Elletta – Last Post
- Elletta – Social Media icons
To set up your widget, navigate to WP Dashboard > Appearance > Widgets > and drag & drop the "elletta - widget" widget into the sidebar area.
SETTING UP YOUR NEWSLETTER WIDGET AT HOME
Elletta includes custom stylings for the "MailChimp for WordPress" plugin which allows you to display a beautiful newsletter sign-up form. You can insert this form within the Sidebar area, in a special widget area beneath the Featured Area element, or in a special widget area beneath a Post on its singular post page.
For steps on setting your newsletter form up, please check out this article: How to setup Elletta's newsletter widget
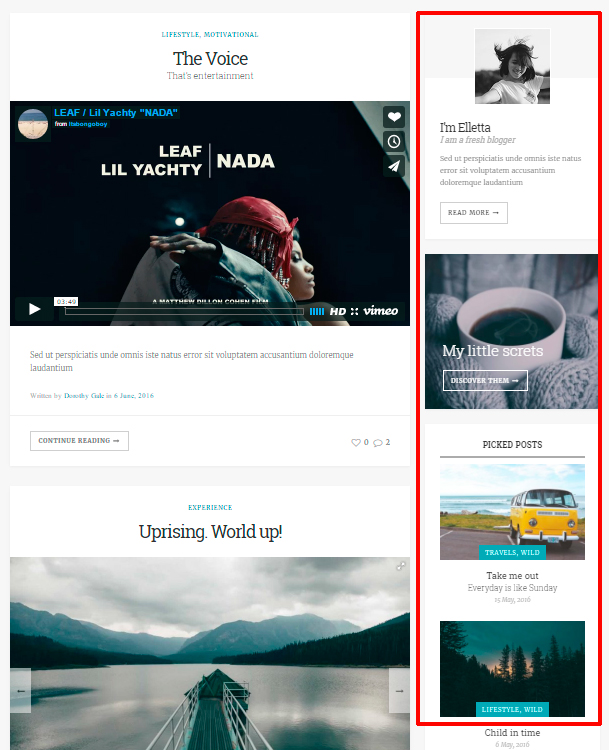
SETTING UP YOUR SIDEBAR
A sidebar is a vertical content area that displays to the right of your main content/post area. You customize your sidebar by stacking up different widgets that display a variety of things.
ENABLING/DISABLING THE SIDEBAR:
To enable/disable the sidebar on your homepage and/or your archive pages (category pages, tag pages, etc.) navigate to
WP Dashboard > Appearance > Customize > Home Settings. Here, you can check or un-check the boxes next to "Configure Home Sidebar"
WP Dashboard > Appearance > Customize > Page Settings. Here, you can check or un-check the boxes next to "Configure Page Sidebar"
WP Dashboard > Appearance > Customize > Post Settings. Here, you can check or un-check the boxes next to "Configure Post Sidebar"
ADDING WIDGETS TO YOUR SIDEBAR:
To add, remove, or edit your sidebar widgets, navigate to WP Dashboard > Appearance > Widgets.
On the left, you will see a list of the available widgets to choose from.
On the right, you will see a few different widget areas in the theme.
To add a widget to your sidebar, simply drag & drop a widget on the left into the widget area titled "Sidebar".
EDIT WIDGETS IN YOUR SIDEBAR:
Once you've dropped a widget into the Sidebar widget area, click on its heading. A drop-down will appear and you can make any necessary adjustments to the widget's settings. From this widget setting drop-down, you can also delete the widget.
To position widgets within the sidebar, drag and drop them above or below each other.
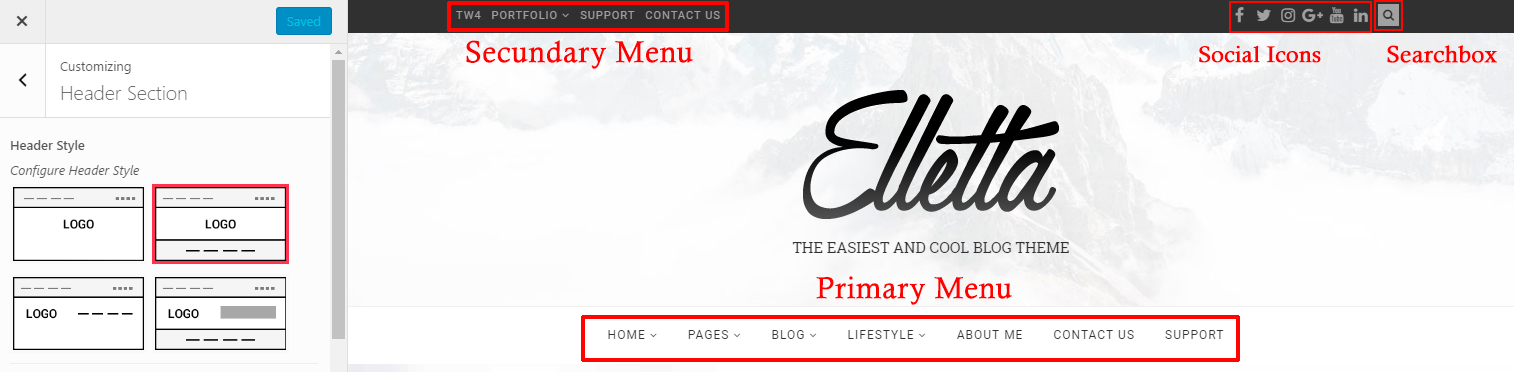
SETTING UP THE HEADER AREA
The header is probably one of the first things you will want to setup. The header consists of pretty much everything above and including the menu. There are many different elements to the header and many ways to customize it including colors, content, design and more. All of this is done via Apparence -> Customize -> Header Section. The following sections will cover several different sections of the header that are listed below:
- Header Style: 4 header available
- Upload a Background Image
- Configuration Primary Menu
- Configuration Secondary Menu
- Show/Hide Searchbox
- Show/Hide Social Icons
SETTING UP THE FOOTER AREA
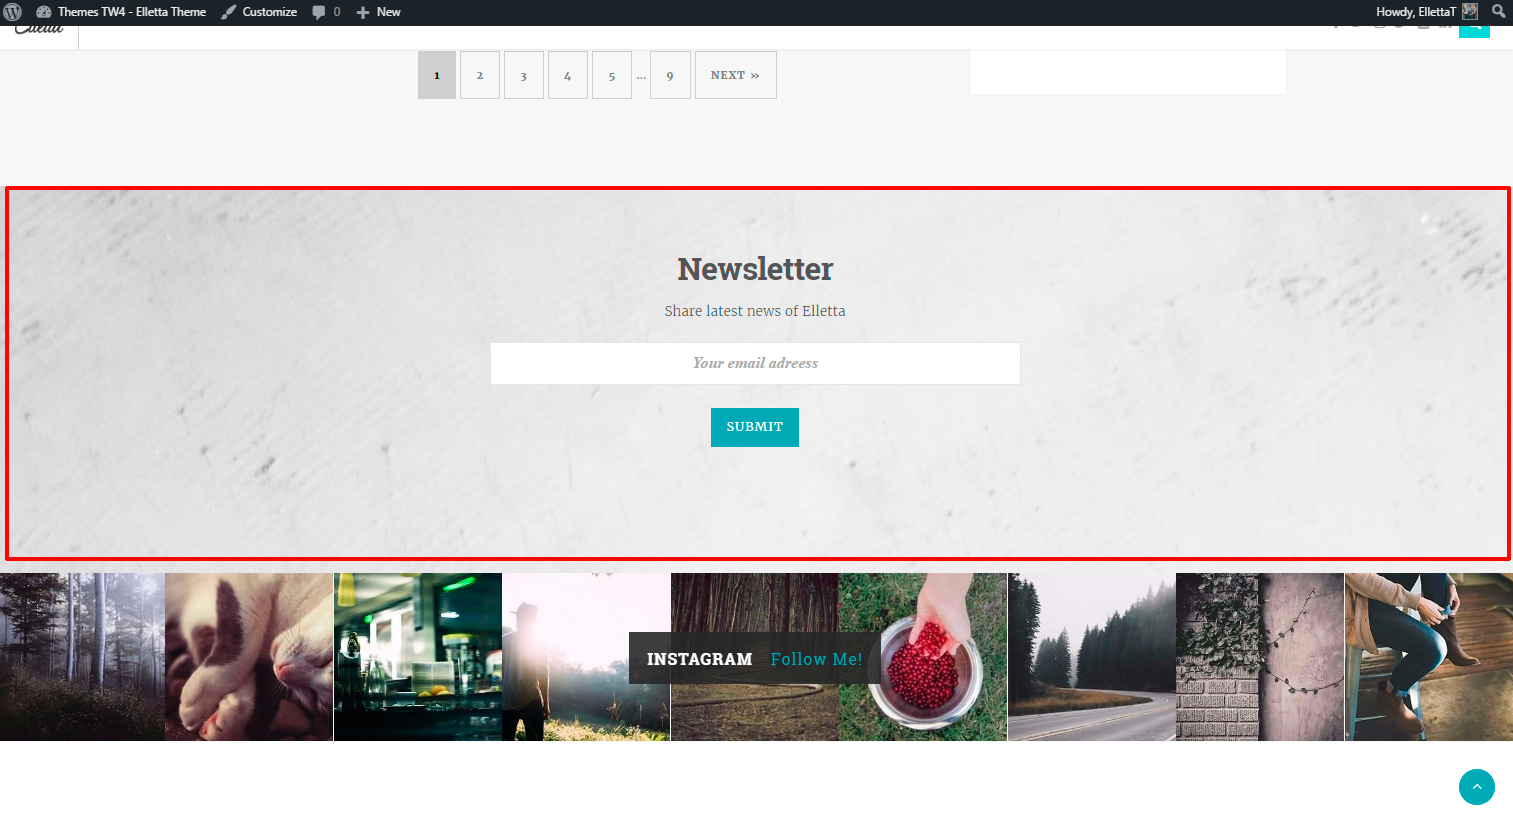
The footer area is the lower portion of the theme that will appear on all pages of your site. It can include:
- Newsletter in Home page
- Instagram footer area
- Footer layout
- Copyright text area
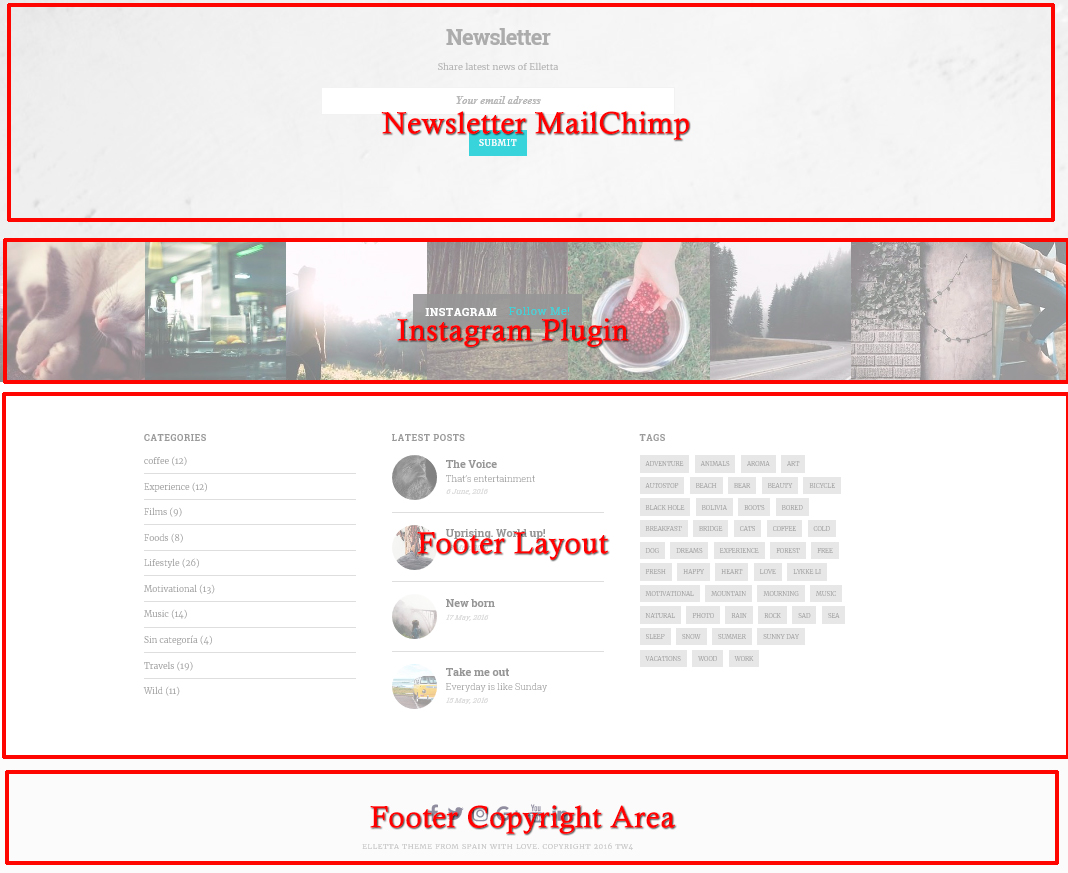
NEWSLETTER MAILCHIMP:
Elletta includes custom stylings for the "MailChimp for WordPress" plugin which allows you to display a beautiful newsletter sign-up form. You can insert this form within the Sidebar area, in a special widget area beneath the Featured Area element, or in a special widget area beneath a Post on its singular post page.
For steps on setting your newsletter form up, please check out this article: How to setup Elletta's newsletter widget
INSTAGRAM FOOTER AREA:
Similar to the section above regarding "Setting up your Sidebar", the footer has a widget area titled "Instagram Footer" where you can add in a widget to display your Instagram images in a full-width section.
The widget is simply called "Instagram" and is made available after installing & activating the plugin called WP Instagram Widget.
To add the Instagram widget, navigate to WP Dashboard > Appearance > Widgets.
On the right, you'll see the theme's different widget areas. One of which is the widget area titled "Instagram Footer".
Drag the "Instagram" widget from the left of this screen into the "Instagram Footer" widget area. To edit the widget's settings, click on the widget's heading once it's been placed in a widget area. A drop-down area will appear.
To have your Instagram footer display like the Elletta demo site's, set the "Number of photos" option to be "6". Set the "Photo Size" to "Large" and give the widget a "Title" if you'd like the white text box overlay to appear on top of the images.
COPYRIGHT TEXT AREA:
At the very bottom of the theme is a bar which features a text area to include copyright or disclaimer text. You are not required to include a copyright or disclaimer statement. In fact, you can type whatever you'd like in this area!
To edit the two footer text areas, look within
WP Dashboard > Appearance > Customize > Footer Settings.
For help troubleshooting issues in Elletta or to see some fun customization tutorials, check out all of Elletta's FAQ Articles here! Elletta Articles
And, as always, if you have any theme-related questions you can't find the solution to in our FAQ article database, you're always welcome to open up a new support ticket.